If you’ve ever tried making gluten-free pizza and ended up with something sad, crumbly, or more like a cracker than a slice, trust me—you’re not alone. I’ve been there, scraping stuck dough off the counter and wondering if pizza night was just a memory from the gluten days.

This recipe completely changed the game for me. It’s the kind of dough you can stretch and shape like regular pizza dough, and it bakes up with a chewy, puffy crust and a thin but sturdy base. The first time I served it at a family dinner, no one even guessed it was gluten-free—they just asked for seconds.
Let me walk you through it, with all the tips I’ve learned from years of gluten-free baking (and lots of trial and error).
Let’s Talk Dough: Why This One Works Like Magic
I used to think gluten-free pizza dough would always be finicky. Either it was dry and cracked when shaping, or it baked up dense and gummy. This dough changed my mind.
What makes it different?
- Hydration is high – and yes, it’ll feel sticky, almost like you’re doing something wrong. But this is what gives you that airy, open crumb and stretchy dough that actually holds up under toppings.
- Psyllium husk is the unsung hero here. It’s what gives the dough strength and that signature chewy bite. Without it, the dough would fall apart before you even got it to the oven.
- And forget rolling pins—this dough is soft enough to shape with your hands, no elbow grease needed.
Just a heads-up: don’t even think about using a 1-to-1 store-bought flour blend here. Those blends are too starch-heavy and will throw off the texture completely. Stick to the custom flour mix—it’s worth it.
Shaping the Dough Without Tears (or Tears)
Now, let’s be real. Sticky gluten-free dough can make anyone question their life choices. But here’s how I keep it chill in the kitchen:
Right after mixing, I plop the dough onto a floured surface, flour my hands like I’m getting ready to clap chalk in a gym, and give it a quick, gentle knead. Nothing aggressive—just enough to bring it together.
I always divide the dough into two equal balls since this makes two pizzas. While working on one, I loosely cover the other with a tea towel so it doesn’t dry out. That step alone has saved me from crusty edges more than once.
And here’s a little habit I’ve picked up: shaping the base first before proofing. I know it sounds backwards, but it works beautifully. You get that puffy crust while still keeping the shape intact.
Proofing Like a Pro (Even Without a Fancy Setup)
For the proofing, I usually just leave the shaped dough on the counter near my stove, lightly covered with a clean kitchen towel. Give it about 45–60 minutes, and you’ll notice it puff up slightly.
If your kitchen runs cold (mine does in winter), I sometimes pop the tray into the oven with just the light on—no heat. That gentle warmth helps the dough rise without drying out.

How I Prep My Oven for That Brick-Oven Feel
I swear by using a baking steel because it gets screaming hot and crisps up the bottom like a dream. If you don’t have one, a heavy-duty baking sheet flipped upside down works just fine. Start heating it up as soon as your dough starts proofing—you want that thing blazing hot.
Set your oven to 475ºF (250ºC) and let it go for a good 45 minutes to preheat. You’ll thank yourself later when that crust hits the hot surface and bubbles up like proper pizza should.
Assembly Time: Toppings and a Simple Trick That Changes Everything
Once the dough is puffed and ready, I transfer it to a floured pizza peel. Here’s the test I always do before topping: give the peel a little shake. If the dough doesn’t slide, I know it’ll stick later—so I gently lift the stuck spots and sprinkle a bit more flour underneath.
Now for the golden trick: brush the edges with olive oil. Just a thin coat, nothing heavy. This keeps the crust from drying out in the oven and helps it turn that deep golden brown that makes it look—and taste—like real pizza.
My go-to toppings? A ladle of tomato sauce, some dried oregano, a sprinkle of parmesan, and shredded low-moisture mozzarella. But honestly, the dough can hold up to anything—veggies, meat, even pineapple if you’re into that.
Into the Oven: That First Bite Is Worth the Wait
Once it’s topped, I slide it onto the hot steel and bake for 15–18 minutes. That’s the sweet spot where the crust is crisp but chewy, and the cheese is bubbling and golden.
The best part? Pulling it out of the oven, cutting it into slices, and watching everyone grab a piece before it even hits the plate. I always plan on making two pizzas because the first one disappears before I can sit down.
What Makes This Dough Actually Work
- Psyllium husk brings flexibility and chew—don’t skip it, don’t swap it.
- High hydration makes the crumb airy and open. It feels weird at first, but just go with it.
- Custom flour blend is key. Using brown rice, sorghum, and tapioca in the right ratio gives that perfect balance without gumminess.
- Shaping first, then proofing might sound unusual, but it helps hold the structure and boosts that puffy crust.
- Olive oil brushed on the edge is your secret weapon for golden, appealing crust—not the pale, dry kind that looks unfinished.

Smart Ingredient Swaps (If You’re Missing Something)
I try to stick to the original ingredients as much as I can, but I know how it is—sometimes you’re halfway through and realize you’re out of something. Here’s what’s worked for me:
- Yeast: If I’m out of instant yeast, active dry works fine—just bloom it first in warm water with a pinch of sugar.
- Psyllium husk powder: Use 85% of the listed amount if subbing for whole husk.
- Millet flour: Brown rice flour does a good job as a backup.
- Tapioca starch: Cornstarch or potato starch can step in here.
- Sorghum flour: I’ve had great results using oat flour or light buckwheat instead.
Just make sure you’re swapping by weight, not cups. A digital scale makes all the difference in baking—especially gluten-free.
Gluten Free Pizza Dough
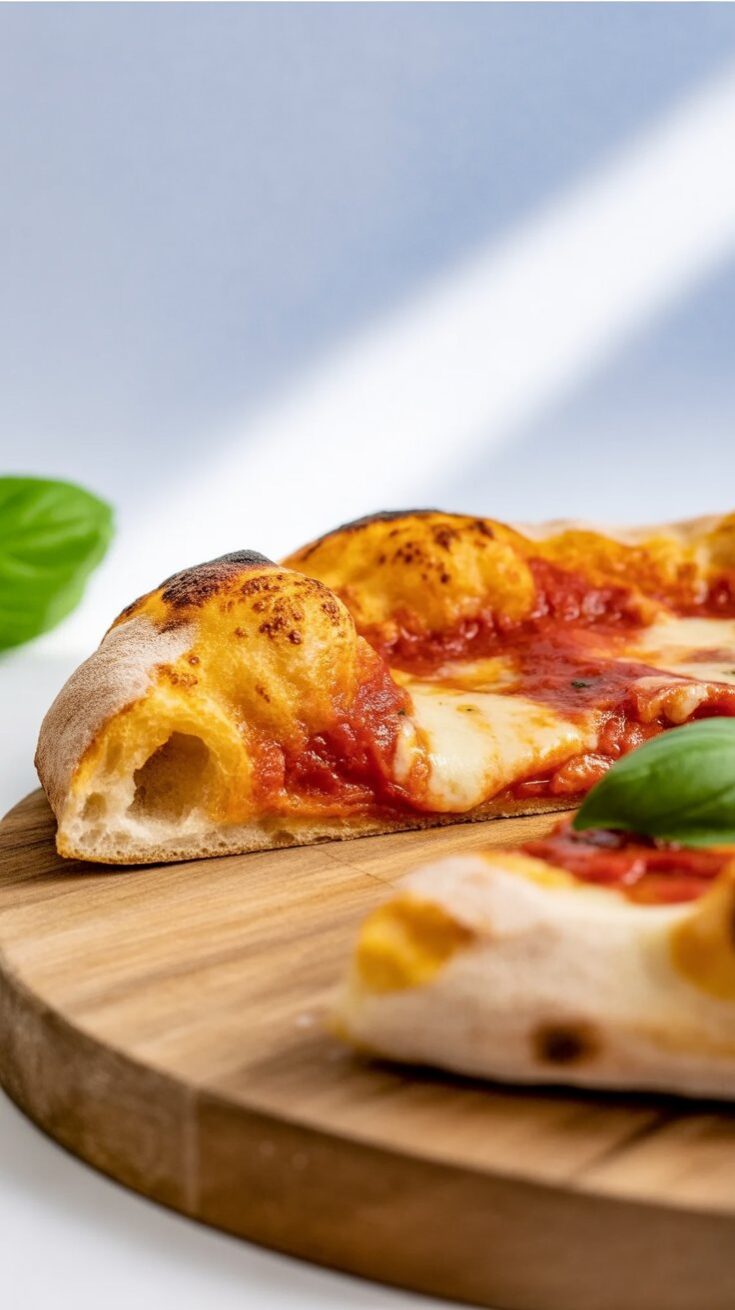
There’s nothing quite like the joy of homemade pizza, and this gluten-free version hits all the right notes. It’s stretchy enough to shape, holds its form beautifully, and bakes into a crust that’s delightfully crisp on the outside and soft and chewy on the inside. You’d never guess it’s gluten-free—and honestly, no one will miss the gluten once they take a bite.
Ingredients
For the dough:
- 1¾ cups lukewarm water (420g)
- 3 tablespoons whole psyllium husk (15g) or 13g if using powder
- ¾ cup + 2 tablespoons millet flour (120g), plus more for dusting
- ½ cup + 2 tablespoons sorghum flour (80g)
- 1 cup tapioca starch (115g)
- 2 teaspoons instant yeast (6g) or 8g active dry yeast
- 1 tablespoon granulated sugar (15g)
- 1 teaspoon salt (6g)
- 2 teaspoons olive oil (8g)
- 1½ teaspoons apple cider vinegar (8g)
Toppings for 2 pizzas:
- ¾ to 1 cup pizza sauce or tomato sauce
- 9 oz low-moisture mozzarella, sliced or shredded
- ½ cup grated parmesan
- 1–2 teaspoons dried oregano
- 1–2 tablespoons olive oil (for brushing crust)
- Fresh basil, for serving (optional)
Instructions
- Prepare the psyllium gel : Start by mixing the psyllium husk with lukewarm water in a medium bowl. Within a minute or so, it will thicken into a gel.
- Mix the dry ingredients: In a large bowl (or a stand mixer if you prefer), whisk together the millet flour, sorghum flour, tapioca starch, sugar, yeast, and salt.
- Combine everything into a dough: Add the olive oil and vinegar into the gel and stir to blend. Pour the mixture into the dry ingredients and begin kneading. If using a mixer, use the dough hook. The dough should be smooth, very soft, and a bit sticky—don’t be tempted to add extra flour. Scrape the sides of the bowl as needed to make sure everything is evenly incorporated.
- Shape and rest the dough: Transfer the dough to a floured surface and knead it gently into a ball. Divide into two portions and shape each into a round. Keep one covered while you work on the other.
- Shape your pizza bases: Flatten one dough ball slightly with your fingertips and begin gently pressing it outward into a circle, leaving a slightly raised edge around the rim. Keep your hands floured and your surface well-dusted. Aim for about 10–11 inches in diameter and a thin center.
- Move the shaped base to a separate floured area, cover with a clean kitchen towel, and shape the second base. Cover both and let them proof at room temperature for 45 minutes to 1 hour, until visibly puffed.
- Preheat the oven: As the dough proofs, place a baking stone or heavy sheet in the oven and preheat it to 475°F (250°C). A hot oven is key to that crisp base.
- Assemble and bake: Once the bases are puffed, place one on a floured pizza peel. Check that it slides easily—dust more flour underneath if needed. Lightly brush the crust with olive oil for that golden, crisp edge.
- Spread on your sauce, sprinkle with oregano and parmesan, and top with mozzarella. Slide the pizza onto the preheated stone or sheet and bake for 15–18 minutes, until the cheese is bubbling and the crust is deeply golden.
- Repeat and serve: While the first pizza bakes, assemble the second. Once both are done, top with fresh basil if you like, slice, and serve while still warm.
Nutrition Information
Yield
2Serving Size
1Amount Per Serving Calories 1640Total Fat 123gSaturated Fat 33gTrans Fat 0gUnsaturated Fat 84gCholesterol 122mgSodium 2943mgCarbohydrates 96gFiber 9gSugar 16gProtein 42g
Leafyplated.com, occasionally offers nutritional information for recipes contained on this site. This information is provided as a courtesy and is an estimate only. This information comes from online calculators. Although Leafyplated.com attempts to provide accurate nutritional information, these figures are only estimates.
Final Thoughts (And a Bit of Pizza Night Realness)
This gluten-free pizza dough has become a Friday night ritual in my house. I’ve used it for pizza parties, lazy weeknight dinners, even packed leftovers for next-day lunches. It reheats well, holds its shape, and doesn’t leave you feeling like you’ve missed out on anything.
If you’re new to gluten-free baking or have had one too many dough disasters, I hope this recipe changes things for you like it did for me. Give it a try, tweak the toppings to suit your mood, and enjoy that first bite of real, honest-to-goodness pizza—minus the gluten.
Try Other Gluten Free Recipes:
")